When the Desheng BCL2000 radio uses AC power, it has a slight hum. It is close to the professional high-end BCL machine, and there will also be stereo line output. The quality of band switches and potentiometers needs to be improved. Today Xiaobian will tell you how to use the old electrical appliances to change the Desheng BCL2000 radio, unique mute function, output impedance 32Q, 20 seconds output short circuit protection.
Desheng BCL2000 radio is easy to operate and easy to use. The flywheel design is unique. The fast and slow speed shifting gears are well-feeled, the LCD display is clear, the orange backlight is also very eye-catching; the FM performance is outstanding, and the large-caliber speaker uses BTL power amplifier to push the sound. Sweet and soft; medium wave sound quality is very good; when using AC, there is a slight hum; the whole machine art design and mold making is very professional style, close to the professional high-end BCL machine; the headphone jack is no stereo, but there is stereo Line output; now the new version (the knob has a red bar) SW frequency drift is still a bit, not eradicated; the quality of the band switch and potentiometer needs to be improved, but Desheng's after-sales service is legendary! As for the effect of controversial sw, sensitivity and selectivity are good, just need to listen to the time to correct the frequency in time. In addition, the practical functions such as the timer switch are also perfect. It is easier to improve and need to fight a lot of places, the second time for the FM receiver and headphone output to play the following points to enjoy a better listening effect, the components required for the machine are clever use of waste electrical appliances, and the overall appearance of the machine does not do Any changes have added unexpected new features.
1, the motor should be the first power supply.Use the original AC power cord of the machine, turn off the volume after the FM band is turned on, and still get the background noise and hum of the "shasha", and take the old BBK AC adapter that outputs 9V/1A, and Learn to connect the two 7805 voltage regulators on the power supply board together with the high-quality aluminum heatsink. After disconnecting the adapter output cable, add the voltage regulator circuit. It must be connected to the 7805 grounding pin and connect two 2N4001 diodes. Output to 6V to meet the requirements of use (not necessarily separately purchased 7806). The radio comes with a DC input interface and this regulator plug fits perfectly. After the trial, the communication sound has been basically eliminated. The long-term continuous use of the transformer is only slightly warm, and at the same time eliminates the insecure factor caused by the direct introduction of the 220V mains to the bedside or the pillow, and the family with the child is more assured. At the same time, the original transformer inside the machine is removed without reducing interference and weight.
2. APA3541 chip function introductionThis IC is Taiwan's ANPEC high-fidelity earphone dedicated dual-channel amplifier, widely used in various optical drives and MP3, low power consumption, low distortion (THD=0.03%), unique mute function, output impedance 32Q, 20 seconds output short circuit protection.
The pin function is: 8-pin power supply (voltage range 3 to 8V), 2 feet have mute function, need to connect 100kΩ pull-up resistor to 6V power supply to output sound signal, otherwise it is mute state, 6 feet have squelch and eliminate boot Impact noise, the remaining pins are shown in the drawing.
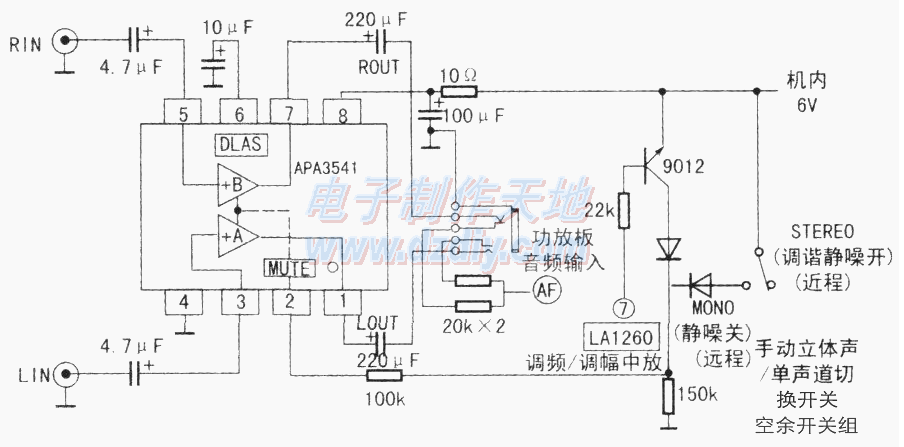
The headphone output of this machine is a mono program. Although there is a stereo lotus line output terminal, it is found that the sound that is barely heard is like a mosquito called after the headphones are plugged in, and the headphones are not pushed at all, so it is necessary to add a dual-channel earphone. The amplifier can enjoy true FM headphone stereo. Open the Samsung 52x CD-ROM. You can find the audio output pin of the 8-pin integrated circuit APA3541 along the optical drive headphone jack. You can find the audio input pin along the volume potentiometer. The other pins are also quickly found. APA3541 And the surrounding useful components are removed from the optical drive (does not affect the normal reading of the optical drive). In addition, the test board is assembled again. Since the original capacitors are all high-quality micro-electrolytic capacitors, they can be copied as they are. To reduce the volume, the bias capacitors and the decoupling capacitors are chip tantalum capacitors. The amplifier board is built into the machine and fixed with hot melt adhesive to prevent machine vibration. The IC power supply can be taken directly from the VCC/6V solder joint in the machine. It can also be considered to connect the 10Ω decoupling step-down resistor in series. The grounding line should be star-shaped. Grounded, not connected to a loop. Cut off the copper foil of the radio two-channel headphone jack, and then short the original horn switch wire with solder (note that it must not be grounded), then solder the amp audio output cable to the radio headphone jack. The audio input cable can be soldered directly to the radio line output stereo lotus terminal pin. In order not to damage the beautiful appearance of the original machine, there is no separate volume potentiometer, it can be used with the headset with its own volume control. When listening to the sound of FM99.7 music, the stereo resolution is high, the sound quality is clear and bright, and warm. Guitar and piano music are especially resistant.
4. Use the 2-pin mute pin to increase the full-band tuning squelch function.The premise of implementing the tuning and squelch is that the 7-pin of the 16-pin dual-in-line integrated circuit LA1260 has the function of driving the tuning indicator to drive the output. When the tuning station frequency is in the optimal state, the 7-pin no-load output Negative 4V voltage, this pin quickly becomes open when the frequency is shifted, no output. Therefore, the circuit shown in the figure is designed. When tuning to the radio, the triode is saturated and turned on, and the output is high to the APA3541 mute pin 2, so that the amplifier works normally. When there is no stage, the triode is open, and the C and E poles are cut off and muted. The 2-pin ground is low, and the mute has no output, thus achieving tuning and squelch.
5. Add manual tuning squelch switch and speaker tuning squelchThe original stereo/mono switch is a double-pole double-throw, only one of which is used for stereo state switching, and the other group has no external copper foil lead, which can be used as shown in the figure. In order to make the speaker output also have the tuning squelch function, cut off the cable AF (audio) input of the low-frequency amplification version (that is, the board with the volume potentiometer) (each line is printed at the root of the connector), and then from the stereo socket The middle two terminals can realize the APA3541 output two channels mixed input. At this time, the APA3541 is used as the front audio amplification, and the original two-channel socket switching function is used to automatically cut off the speaker output after the earphone is inserted.
Add an interesting usage list after the modification:1. The proper use of the tuned squelch function is very important. When using the tuning squelch, turn the stereo switch to the stereo position. The FM band filters the noise signal and the weak signal mirror between the two, and the howling noise caused by the computer running. No noise. Some stations that are too weak are also muted, but this kind of non-enjoyed weak table listens to stereo noise too loudly. At this time, switching to the mono state (turning off the squelch) can listen to the remote weak station and close it at the same time. The stereo reduces noise, conforms to the correct listening rules and simplifies operation. For medium wave, the short wave band is equipped with a sensitivity gain adjustment knob (please refer to the manual), which can adjust the medium/short wave tuning squelch sensitivity steplessly. When using, first turn the sensitivity adjustment knob to a larger position to find a station. The frequency will hear noisy background noise, and then gradually reverse back to just trigger the silent work, and then normal search, forming a "threshold", then neither the weak station nor the tuning squelch is normal. At the same time, it is convenient to quickly adjust the sensitivity of the radio to the right one, and eliminate the background noise during the tuning, especially in the case where a short-wave radio station is disturbed, the search efficiency can be improved. This method of retreating is effective, two There is obviously a demarcation between them: if the sensitivity is increased, the interference is more severe. At this time, it is better to turn on the "narrow-band switch" and the "low-pass filter switch" at the same time to avoid interference.
2. The stereo headphone output function has been added and the stereo sound is excellent.
3. Added no signal automatic mute function, when the radio stops or frequency shifts, etc., the automatic squelch is muted, and the hearing is protected when you listen to the camera. You don't have to bother to calculate the radio stop and time off time (the default shutdown time is 90). Minutes); you can avoid waking up in a noise when you use the timed power function.
4. Manual tuning squelch switch and stereo / mono switch composite use, one button multi-energy, reasonable combination, long-range reception is correct. Line output/line input function has been added. Can not be turned on as a two-channel headphone amplifier, just turn the composite stereo switch to mono, and plug the source into the original line output interface with the lotus terminal.
6. The radio is used as a mono active speaker. When the power is turned on, find a signal indicating position. From the sound card of the computer, use a 3.5-pin to double lotus plug to connect to the radio composite line input terminal, then you can use the radio to adjust the volume and enjoy the high and low sound. The effect of large caliber speakers. I use it to play CS or as a TV card sound output is good, it feels very interesting (if you can change to the same diameter anti-magnetic speaker can be used close to the display, otherwise please distance 0.5M or more). It is also possible to connect an MP3 player.
7. Listen to the network broadcast function, you need to connect to the computer, the method is the same as above, with the computer remote control and "tornado" and other listening software can be remotely changed, the radio plays the role of power amplifier, this way is very interesting to listen to!
Precautions:
1. The 3.5mm stereo plug, socket and volume potentiometer can be used to make an external headphone extension with volume adjustment. It can be used with your high-end headphones. It is best to use the self-contained volume to adjust the computer headset, which is cheap and good.
2. Difficulties in disassembly: When the radio tuner is disassembled, please first screw it to one end, then remove the center screw of the disc and lay it flat to avoid disassembly and assembly of the tuning wire.
3. The first page of the manual describes the boot time display of this machine is preset to 12-hour system. This is inconsistent with the 24-hour system of the radio station frequency meter and standard radio station time and the author's usage habits, but there is no way to switch the time system in the manual. When the hour indicator of this machine is displayed in time (power is not turned on), just press 4 seconds to switch the time system, but if your radio cuts off the power for more than the memory time of the memory capacitor, the time after the next power-on Still showing the 12-hour format, if you think it is a 24-hour system, it is easy to get wrong. A complete solution is to disassemble the time display control board, remove the solder from the four solder joints of the shield on the back of the board, and then use a multi-strand copper wire to remove some of the solder, then heat the solder joints to Remove, you can see a soft package dedicated ic in the middle of the control board, this ic left upper foot has four square solder joints that are close to each other is the preset jumper point. After the soldering iron is powered off, it will be labeled as 2 feet. The solder joint that is closer to the direction of the cable holder and the solder joint that is grounded next to it are directly short-circuited with solder to complete the preset 24-hour jumper. Solder the shield back, use a small amount of solder to strengthen, prevent machine vibration, clean the welding slag to prevent short circuit, press the reset button to clear the memory before power-on, then complete the setting after power-on, and keep the power-on preset for 24 hours.
Incremental encoders provide speed, direction and relative position feedback by generating a stream of binary pulses proportional to the rotation of a motor or driven shaft. Lander offers both optical and magnetic incremental encoders in 4 mounting options: shafted with coupling, hollow-shaft, hub-shaft or bearingless. Single channel incremental encoders can measure speed which dual channel or quadrature encoders (AB) can interpret direction based on the phase relationship between the 2 channels. Indexed quadrature encoders (ABZ) are also available for homing location are startup.
Incremental Encoder,6Mm Solid Shaft Encoder,Hollow Rotary Encoder,Elevator Door Encoder
Jilin Lander Intelligent Technology Co., Ltd , https://www.jllandertech.com